Atlantis: Shepherd's Journal 2
Next steps for this piece were the long awaited ones for me!
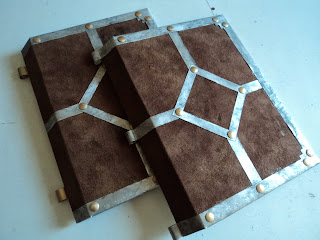
Using thin aluminum sheets, I cut out the pieces need for both covers and went on to sand them using a 220 sand paper to give the surface a brushed finish...Started by inking in the design on the hardcovers and using it as a guide to super glue the pieces you see in the images above and below...
First thing to glue down was the brown micro suede which I weathered a bit using black diluted acrylic and bleach. (bleach worked wonderfully!)
The micro suede was cut and glued down, making sure to avoid covering the magnets. (At this point the magnets were already glued in)
At this time all the metal pieces were dirtied up using an iron paint used for outdoor sculptures... I started by super gluing the metal pieces to the back cover since it was the simplest to work on. The piece with the diamond was glued down first, then the frame.
No images on this: Before the tabs were folded over, I glued in the inner lining of the covers using a pearl paper that was lightly stained with coffee to match the pages...
Next up was work on the cover. This one would have its metal pieces wrap around the hinge rod.
The aluminum strip was shaped around the metal rod and glue to its back...(if that makes sense?)
Two other ones were made in the same manner. These would be spray painted gold and attached to the back cover...
The framing metal piece would also be directly attached to the hinge rod so the ends were also curved over as seen below...
...quick test on the hinge...
Oh! and here you get a glimpse of the added wood filler to the rod ends!
From the image above, the two tabs you see flipped to the left are the ones that would be sprayed gold and attached to the back cover piece...
at this point the pearl paper for the inner lining was glued in and allowed me to go ahead and fold the metal tabs over...the metal frames were glued down using the E6000 and lots of butterfly clips to clamp it down while it dried...
Thumb tacks were sanded and spray painted; it's pointy end was cut out and then they were ready to be glued on...
and just like that the cover pieces are ready for the rod!
Final steps and images will be up on the next post!


Love this!!!! If you have any tips on how to make this it would be soooo appreciated thanks for sharing..if I can make one for my Grandson He would be in Heaven for x-mass. 2015
ReplyDeleteThank you!!!!!!!!
Jamie Honley
I love the way when make this journal. Atlantis:The Lost Empire is my favorite Disney movie.
ReplyDelete